Running Your Android Phone/Tablet on a virtual machine January 5, 2013
Posted by GuySoft in Android, diy, Hamakor, linux, open source, Uncategorized.Tags: android, howto, open source, titanum, virtualbox
trackback

Android VM on Virtualbox
Hey all,
My phone has died, and was sent to repair. And since I have a complete backup of it, as explained in my last post, I thought I might try and emulate it on my laptop.
So in this post I’ll explain how to do just that. And one the side effects is that I can now use whatsapp on my PC!
What you will need
- A backup of your phone that was done with Titanium Backup – Follow my previous post on how to do that. Note that for Titanium Backup to run you need to root your phone.
- A computer that is running virtual box and virtualbox-fuse – I will show how to do this in Linux, but windows and Mac can do this too.
- A copy of AndoVM – This is the reason we can do this, since android by default does not come with an Ethernet drivers and AndroVM is compiled and distributed to run on virtualbox out of the box (pun intended).
How to do it
- If you don’t have virtualbox and virtialbox-fuse, on ubuntu it can be installed with apt-get:
apt-get install virtualbox virtualbox-fuse - Download an AndroVM OVA image. I recommend the p or tp revision (tablet + phone) make sure you grab the one with googleaps included! Otherwise its harder to install Titanium Backup.
- Go in Virtualbox to File > Import and select the OVA file you downloaded.
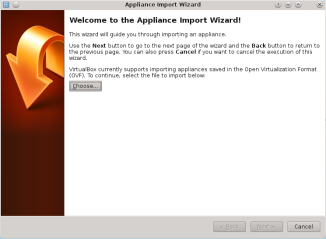
Virtualbox Import
- We need to set a Host-Only network for the Internet to work. Go in Virtualbox to File > Preferences, NOT the settings in the VM and in to the “Network” tab click the small green plus button in the right of the dialog to add a new Host-Only network. And select “Ok”.
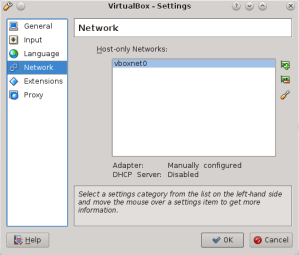
Setting a new vhost in android’s preferences
- Now we need to set up the network. There are two Ethernet cards to this VM, if you do not follow this you will not have Internet access on the VM. One card is for for connecting to the VM for debugging, the other for the wifi emulation. The first needs to be set to Host-Only adapter.

First Ethernet card settings
The second card is set to bridged adapter:
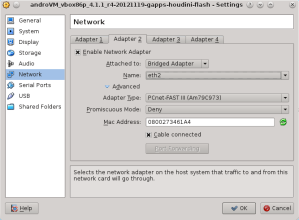
Second Ethernet card settings
Don’t forget to save your settings!
- Next we mount the sdcard and copy our backup made by Titanium Backup on the phone. First get the location of the 3rd vmdk disk from the VM’s settings tab in your virtual machine you created, which is where there data should be copied:

Find where your VDI is located
Then you can copy to it the Titanium Backup you have using
vdfuse:
sudo su

mkdir /mnt/fuse

mkdir /mnt/sd

vdfuse -f /path/to/virtualbox/image/androVM_vbox86p_[version]-[date]-gapps-houdini-flash/androVM_vbox86p_[version]_r4-[date]-gapps-houdini-flash-disk3.vmdk /mnt/fuse/

mount /mnt/fuse/EntireDisk /mnt/sd

cp -av /path/to/titanum/backup/titan_backup /mnt/sd/

umount /mnt/sd

umount /mnt/fuse - Its time to switch on the VM, set it up, and restore your phone data in to it. Note: F1 is the menu key and Esc is the back key on the device.
- follow the normal android “welcome” wizard.
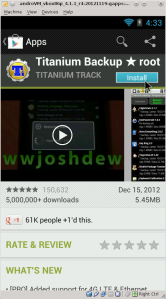
- Open GooglePplay store and download Titanium Backup, if you have the key you can download that too.
- Open Titanium Backup and use F1 to bring up the menu, then select “Preferences”, there select “Backup Folder Location”, choose the folder you copied in step 5, it should be there.
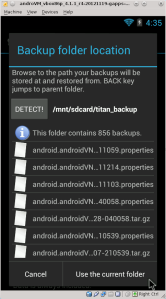
Titanium Backup backup folder set
- Now go to the Backup/Restore, click the top right V icon, and select “Restore missing apps + all system data”. If you have KIES air uncheck it, it seems to be giving problems.
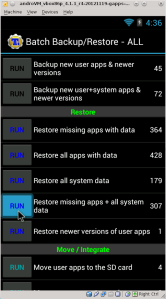
Titanium Backup backup restore all
- After reboot don’t open anything! Go directly again to Titanium Backup, and you will get the following message which lets you set you device ID to the same one on your phone/tablet:
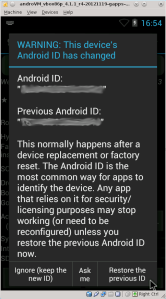
Restore ID of your device
with this you can use Whatsapp on the AndroidVM, and from your PC (assuming you validated it on your phone).
- Thats it! You might need to reconnect to the Wired virtual access point after restoring your phone’s.
Enjoy,
Guy

AndroVM

its work..awesome..
but how to make a call or SMS?
tell me ..
You can’t there is no API support to set for hardware GSM and SMS. You could however try and use VOIP programs that will do calls, and Web-SMS for SMS messages. There should be some level of integration there.
Google Voice + Groove IP will allow you to SMS & place voice calls. You need to have GVoice installed on you backup or it won’t work, it tries to verify that your using a phone as part of the “welcome setup”.
Great Post GuySoft. Question is there another source to get AndroVM Ova images? I don’t know if Genymotion supplies them?
Hi GS, Please help, what information did you save in the fuse.conf file aside from user_allow_other?
I am getting Error when running vdfuse -f command, “NOTE: you must add the line “user_allow_other” (without quotes) to /etc/fuse.confand set proper permissions on /etc/fuse.conf for this to work”.
for the correct permissions I am using
sudo chmod a+rwx /etc/fuse.conf
Ugh, most of us don’t illegally root our phones you know. How about a guide where you don’t have to root your phone?
1. Rooting your phone is legal in Europe, source: http://www.makeuseof.com/tag/illegal-root-android-jailbreak-iphone/
2. You cant extract the settings of the apps without rooting AFIAIK.
3. Some manufactures, such as google let you root the device in their licence.
Thanks for the explanation! Now that Androvm is no more, is it still possible to emulate the Android device on a PC?
I’v been using Android x86
This is an old thread, but: I would like to do this with an older Galaxy Tablet — convert it to a VM. In this case, it’s a friend’s tablet, he passed away and we want to keep it for posterity. I use VMware Fusion, however — mostly a UNIX guy here, but it would seem there must be a way to clone this into the VMware platform.
I’m on OSX, btw. But I can run any Unix/Linux derivative needed.